行路难三首

—— 李白

其一
金樽清酒斗十千,玉盘珍羞直万钱。
停杯投箸不能食,拔剑四顾心茫然。
欲渡黄河冰塞川,将登太行雪满山。
闲来垂钓碧溪上,忽复乘舟梦日边。
行路难!行路难!多岐路,今安在。
长风破浪会有时,直挂云帆济沧海。

其二
大道如青天,我独不得出。
羞逐长安社中儿,赤鸡白狗赌梨栗。
弹剑作歌奏苦声,曳裾王门不称情。
淮阴市井笑韩信,汉朝公卿忌贾生。
君不见昔时燕家重郭隗,拥篲折节无嫌猜。
剧辛乐毅感恩分,输肝剖胆效英才。
昭王白骨萦蔓草,谁人更扫黄金台?
行路难,归去来!

其三
有耳莫洗颍川水,有口莫食首阳蕨。
含光混世贵无名,何用孤高比云月?
吾观自古贤达人,功成不退皆殒身。
子胥既弃吴江上,屈原终投湘水滨。
陆机雄才岂自保?李斯税驾苦不早。
华亭鹤唳讵可闻?上蔡苍鹰何足道?
君不见吴中张翰称达生,秋风忽忆江东行。
且乐生前一杯酒,何须身后千载名?

赠从兄襄阳少府皓

—— 李白

结发未识事,所交尽豪雄。
却秦不受赏,击晋宁为功。
托身白刃里,杀人红尘中。
当朝揖高义,举世称英雄。
小节岂足言,退耕舂陵东。
归来无产业,生事如转蓬。
一朝乌裘敝,百镒黄金空。
弹剑徒激昂,出门悲路穷。
吾兄青云士,然诺闻诸公。
所以陈片言,片言贵情通。
棣华倘不接,甘与秋草同。

侠客行

—— 李白

赵客缦胡缨,吴钩霜雪明。
银鞍照白马,飒沓如流星。
十步杀一人,千里不留行。
事了拂衣去,深藏身与名。
闲过信陵饮,脱剑膝前横。
将炙啖朱亥,持觞劝侯嬴。
三杯吐然诺,五岳倒为轻。
眼花耳热后,意气素霓生。
救赵挥金锤,邯郸先震惊。
千秋二壮士,烜赫大梁城。
纵死侠骨香,不惭世上英。
谁能书阁下,白首太玄经。

CentOS双线服务器路由配置

服务器双线由教育网和电信网组成,实现不同的路线过来的用户按原来的路返回数据。

一、基本信息

操作系统:CentOS 6.4

网卡0(教育网):IP:10.10.10.10 掩码:255.255.255.0    网关:10.10.10.1

网卡1(电信网):IP:192.168.1.10 掩码:255.255.255.0  网关:192.168.1.1


二、实现方法

方法一:导入静态路由

选用导入静态路由表,这个办法其实问题很多:

1 、电信用户如果被解析到教育网的IP上, 服务器根据路由表会返回电信线路,但用户请求的是教育网IP,所以用户什么也得不到,就好像你从一楼买了东西,商场却在二楼给你出货了,而且不告诉你要去二楼拿。

2 、就算被正确解析了 ,但是如果是移动网用户,服务器会因为路由表里没有IP记录而不会返回任何东西。

3 、IP不断的都在变化,也有新增的,要不停的维护路由表实在太累。

以上三条中的任意一条的存在,我想你都不会考虑用静态路由表了。


方法二:根据网卡返回数据

1.增加两个路由表

#vim  /etc/iproute2/rt_tables

添加以下内容

252     ChinaNet
251     CerNet

2.设置电信和教育网路由

#vim /etc/rc.d/rc.local

添加以下内容

#默认路由线路
ip route replace default via 192.168.1.1 dev eth1

#刷新ChinaNet路由表
ip route flush table ChinaNet

#添加回环地址
ip route add default via 192.168.1.1 dev eth1 src 192.168.1.10 table ChinaNet

#从192.168.1.10 过来的,走ChinaNet路由
ip rule add from 192.168.1.10 table ChinaNet

#刷新CerNet路由表
ip route flush table CerNet
ip route add default via 10.10.10.1 dev eth0 src 10.10.10.10 table CerNet

#从10.10.10.10过来的走CerNet路由
ip rule add from 10.10.10.10 table CerNet

3.重启服务器并测试

#reboot


测试效果:

本地:分别ping 教育网和电信网IP,看是否能通,我在教育网分别访问服务器教育网和电信网ip能返回数据包

网络:http://ping.chinaz.com/ 分别输入你的服务器ip测试访问效果,或者输入域名也可以(有解析双线的域名)

到这里如果没有其他意外,你应该成功设置好了双线路服务器。


4.默认网关配置

默认的,我把服务器的默认网关设置成了电信网,教育网网卡没有设置网关

注释教育网网关:

#vim /etc/sysconfig/network-scripts/ifcfg-eth0

#GATEWAY=10.10.10.1


电信网网关不改:

#vim /etc/sysconfig/network-scripts/ifcfg-eth1

GATEWAY=192.168.1.1

CentOS配置svn服务

一、安装subversion

安装subversion服务软件

#yum install subversion

查看安装后文件的分布情况

#rpm -ql subversion

卸载subversion

#yum remove subversion

停止subversion服务

#killall svnserve

二、创建仓库

以创建多个仓库为例

#svnadmin create /var/svn/demo
#svnadmin create /var/svn/test

/var/svn/demo和/var/svn/test为所创建两个新仓库的路径,理论上可以是任何目录。这里我取/var/svn为所有仓库的根路径,在目录下面分别创建仓库。

三、配置仓库

针对每个仓库单独配置,分别修改每个仓库conf目录下的三个配置文件(authz、passwd、svnserve.conf)

1.修改authz文件,这个配置文件里面可以设置用户组和用户目录权限

#vim /var/svn/demo/conf/authz
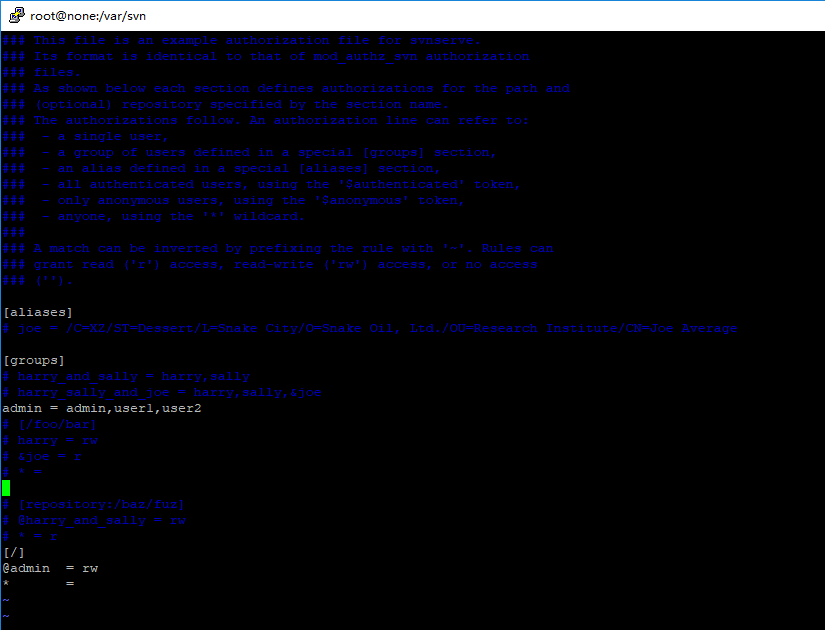
### This file is an example authorization file for svnserve.
### Its format is identical to that of mod_authz_svn authorization
### files.
### As shown below each section defines authorizations for the path and
### (optional) repository specified by the section name.
### The authorizations follow. An authorization line can refer to:
###  - a single user,
###  - a group of users defined in a special [groups] section,
###  - an alias defined in a special [aliases] section,
###  - all authenticated users, using the '$authenticated' token,
###  - only anonymous users, using the '$anonymous' token,
###  - anyone, using the '*' wildcard.
###
### A match can be inverted by prefixing the rule with '~'. Rules can
### grant read ('r') access, read-write ('rw') access, or no access
### ('').

[aliases]
# joe = /C=XZ/ST=Dessert/L=Snake City/O=Snake Oil, Ltd./OU=Research Institute/CN=Joe Average

[groups]
# harry_and_sally = harry,sally
# harry_sally_and_joe = harry,sally,&joe
admin = admin,user1,user2
# [/foo/bar]
# harry = rw
# &joe = r
# * =

# [repository:/baz/fuz]
# @harry_and_sally = rw
# * = r
[/]
@admin 	= rw
*	=

上面加粗部分是我配置的内容,第一部分配置一个用户组admin 有成员admin和user1、user2三个;第二部分配置目录权限,设置admin组(前面加@符号)的权限为读写权限,其他成员没有权限(* = )

2.修改passwd文件,设置访问当前仓库的用户和密码

#vim /var/svn/demo/conf/passwd
passwd文件配置

3.修改svnserve.conf文件,开启权限控制等功能

找到第一个常规选项[general],把前面是一个#号的去掉#号,如下是我的demo仓库配置内容

#vim /var/svn/demo/svnserve.conf
[general]
### These options control access to the repository for unauthenticated
### and authenticated users.  Valid values are "write", "read",
### and "none".  The sample settings below are the defaults.
anon-access = none
auth-access = write
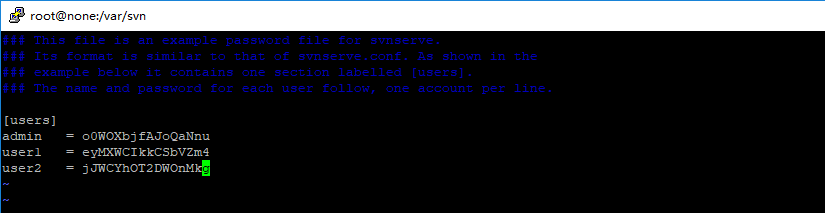
### The password-db option controls the location of the password
### database file.  Unless you specify a path starting with a /,
### the file's location is relative to the directory containing
### this configuration file.
### If SASL is enabled (see below), this file will NOT be used.
### Uncomment the line below to use the default password file.
password-db = passwd
### The authz-db option controls the location of the authorization
### rules for path-based access control.  Unless you specify a path
### starting with a /, the file's location is relative to the the
### directory containing this file.  If you don't specify an
### authz-db, no path-based access control is done.
### Uncomment the line below to use the default authorization file.
authz-db = authz
### This option specifies the authentication realm of the repository.
### If two repositories have the same authentication realm, they should
### have the same password database, and vice versa.  The default realm
### is repository's uuid.
realm = demo

注意:所有的行都必须顶格,否则报错。

备注:多个仓库使用同一套账号密码认证,可以通过修改各个仓库的配置文件svnserve.conf 来实现,将认证文件和密码账号文件指向同一个文件即可。

四、启动和关闭服务

1.启动服务

#svnserve -d -r /var/svn --listen-host
192.168.1.100

命令中/var/svn是我所有仓库的所在的根目录,如果单个仓库,可以直接写仓库地址即可,比如启动demo仓库,#svnserve -d -r /var/svn/demo –listen-host 192.168.1.100

2.停止服务

#killall svnserve

五、访问仓库项目

我们有两个代码仓库/var/svn/demo 和/var/svn/test,那么在客户端访问时可以用。

svn://192.168.1.100/demo
svn://192.168.1.100/test

六、开放服务器端口(可选)

svn默认端口是3690,如果你设置了防火墙,你需要在防火墙上开放这个端口,iptables如下配置:

#/sbin/iptables -A INPUT -m state --state NEW -m tcp -p tcp --dport 3690 -j ACCEPT
#/sbin/service iptables save

(完)