
一、安装subversion
安装subversion服务软件
#yum install subversion
查看安装后文件的分布情况
#rpm -ql subversion
卸载subversion
#yum remove subversion
停止subversion服务
#killall svnserve
二、创建仓库
以创建多个仓库为例
#svnadmin create /var/svn/demo
#svnadmin create /var/svn/test
/var/svn/demo和/var/svn/test为所创建两个新仓库的路径,理论上可以是任何目录。这里我取/var/svn为所有仓库的根路径,在目录下面分别创建仓库。
三、配置仓库
针对每个仓库单独配置,分别修改每个仓库conf目录下的三个配置文件(authz、passwd、svnserve.conf)
1.修改authz文件,这个配置文件里面可以设置用户组和用户目录权限
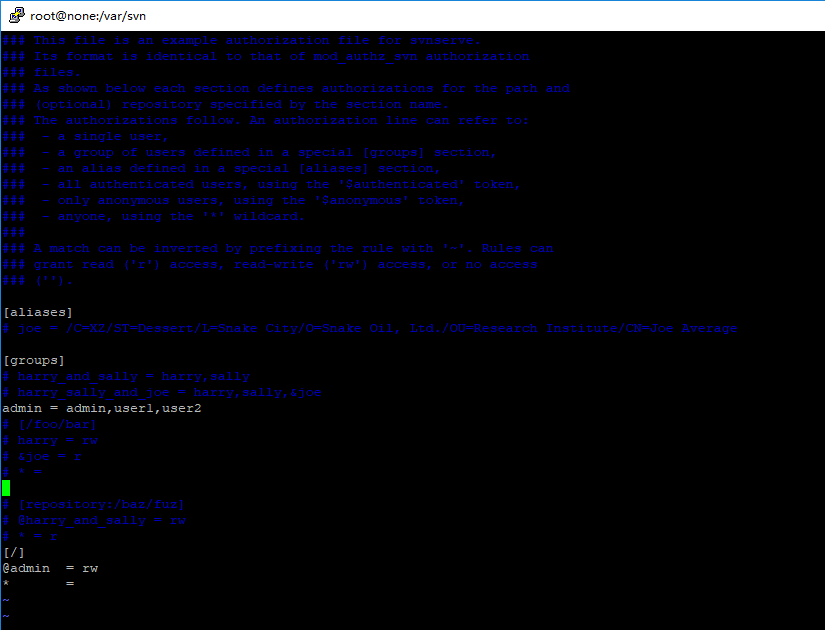
#vim /var/svn/demo/conf/authz
### This file is an example authorization file for svnserve.
### Its format is identical to that of mod_authz_svn authorization
### files.
### As shown below each section defines authorizations for the path and
### (optional) repository specified by the section name.
### The authorizations follow. An authorization line can refer to:
###  - a single user,
###  - a group of users defined in a special [groups] section,
###  - an alias defined in a special [aliases] section,
###  - all authenticated users, using the '$authenticated' token,
###  - only anonymous users, using the '$anonymous' token,
###  - anyone, using the '*' wildcard.
###
### A match can be inverted by prefixing the rule with '~'. Rules can
### grant read ('r') access, read-write ('rw') access, or no access
### ('').

[aliases]
# joe = /C=XZ/ST=Dessert/L=Snake City/O=Snake Oil, Ltd./OU=Research Institute/CN=Joe Average

[groups]
# harry_and_sally = harry,sally
# harry_sally_and_joe = harry,sally,&joe
admin = admin,user1,user2
# [/foo/bar]
# harry = rw
# &joe = r
# * =

# [repository:/baz/fuz]
# @harry_and_sally = rw
# * = r
[/]
@admin 	= rw
*	=
上面加粗部分是我配置的内容,第一部分配置一个用户组admin 有成员admin和user1、user2三个;第二部分配置目录权限,设置admin组(前面加@符号)的权限为读写权限,其他成员没有权限(* = )
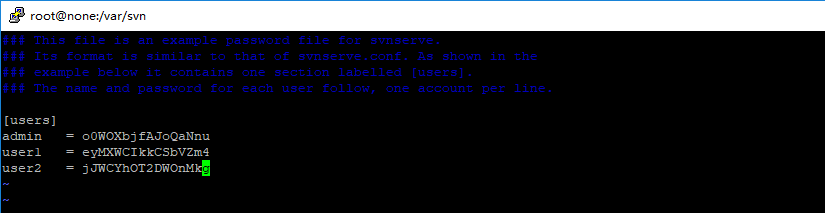
2.修改passwd文件,设置访问当前仓库的用户和密码
#vim /var/svn/demo/conf/passwd
3.修改svnserve.conf文件,开启权限控制等功能
找到第一个常规选项[general],把前面是一个#号的去掉#号,如下是我的demo仓库配置内容
#vim /var/svn/demo/svnserve.conf
[general]
### These options control access to the repository for unauthenticated
### and authenticated users.  Valid values are "write", "read",
### and "none".  The sample settings below are the defaults.
anon-access = none
auth-access = write
### The password-db option controls the location of the password
### database file.  Unless you specify a path starting with a /,
### the file's location is relative to the directory containing
### this configuration file.
### If SASL is enabled (see below), this file will NOT be used.
### Uncomment the line below to use the default password file.
password-db = passwd
### The authz-db option controls the location of the authorization
### rules for path-based access control.  Unless you specify a path
### starting with a /, the file's location is relative to the the
### directory containing this file.  If you don't specify an
### authz-db, no path-based access control is done.
### Uncomment the line below to use the default authorization file.
authz-db = authz
### This option specifies the authentication realm of the repository.
### If two repositories have the same authentication realm, they should
### have the same password database, and vice versa.  The default realm
### is repository's uuid.
realm = demo
注意:所有的行都必须顶格,否则报错。
备注:多个仓库使用同一套账号密码认证,可以通过修改各个仓库的配置文件svnserve.conf 来实现,将认证文件和密码账号文件指向同一个文件即可。
四、启动和关闭服务
1.启动服务
#svnserve -d -r /var/svn --listen-host
192.168.1.100
命令中/var/svn是我所有仓库的所在的根目录,如果单个仓库,可以直接写仓库地址即可,比如启动demo仓库,#svnserve -d -r /var/svn/demo –listen-host 192.168.1.100
2.停止服务
#killall svnserve
五、访问仓库项目
我们有两个代码仓库/var/svn/demo 和/var/svn/test,那么在客户端访问时可以用。
svn://192.168.1.100/demo
svn://192.168.1.100/test
六、开放服务器端口(可选)
svn默认端口是3690,如果你设置了防火墙,你需要在防火墙上开放这个端口,iptables如下配置:
#/sbin/iptables -A INPUT -m state --state NEW -m tcp -p tcp --dport 3690 -j ACCEPT
#/sbin/service iptables save
(完)